1. Welcome to Tundras.com!

    You are currently viewing as a guest! To get full-access, you need to register for a FREE account.

    As a registered member, you’ll be able to:
    • Participate in all Tundra discussion topics
    • Transfer over your build thread from a different forum to this one
    • Communicate privately with other Tundra owners from around the world
    • Post your own photos in our Members Gallery
    • Access all special features of the site

2000 Limited TRD refresh/repair story

Discussion in '1st Gen Tundras (2000-2006)' started by FiatRunner, Nov 25, 2022.

  1. Jan 8, 2024 at 2:37 AM
    #301
    w666

    w666 D. None of the above

    Joined:
    Dec 17, 2019
    Member:
    #40020
    Messages:
    1,623
    Gender:
    Male
    Maryland
    Vehicle:
    04 Access Cab SR5 V8 4WD
    None yet
    Let's see some shots of where the springs meet the axle at the u-joints. There's a bolt that runs through the springs, and sits in a recess on top of the axle to help keep everything in the right place. Your event may have perturbed this alignment, and/or snapped the bolt entirely.
     
  2. Jan 8, 2024 at 10:20 AM
    #302
    FiatRunner

    FiatRunner [OP] 2003 rich

    Joined:
    Nov 25, 2022
    Member:
    #87321
    Messages:
    779
    Gender:
    Male
    First Name:
    Jack
    Chicago Suburbs/Milwaukee
    Vehicle:
    2000 AC Limited TRD + 4WD + Thunder Gray
    See Refresh Thread
    Here ya go… it ain’t pretty but it looks to me like everything’s correct.
    IMG_0245.jpg IMG_0246.jpg IMG_0247.jpg IMG_0248.jpg

    The U bolts are the same distance from the drums on both sides, and aren’t bent or broken.
     
    w666[QUOTED] likes this.
  3. Jan 8, 2024 at 10:25 AM
    #303
    shifty`

    shifty` I'm a member of a country club

    Joined:
    Jun 20, 2020
    Member:
    #48239
    Messages:
    25,740
    ATL
    Vehicle:
    '06 AC Limited V8/4WD
    (see signature for truck info)
    I don't see any evidence of shifting.

    What about the leaf mounts? Any clear signs those are swayed? How are the bushings looking in the rear shackle and front mount, do they appear to have an equal amount on each side of the loop at the end of the leaf?
     
  4. Jan 8, 2024 at 10:30 AM
    #304
    FiatRunner

    FiatRunner [OP] 2003 rich

    Joined:
    Nov 25, 2022
    Member:
    #87321
    Messages:
    779
    Gender:
    Male
    First Name:
    Jack
    Chicago Suburbs/Milwaukee
    Vehicle:
    2000 AC Limited TRD + 4WD + Thunder Gray
    See Refresh Thread
    The spring hangers are tight to the frame, and don’t show any evidence of bending. I cross-checked all four to different points on the frame and got the same measurements on both left and right sides. I also checked the frame with a straightedge to make sure there weren’t any bends that the eye couldn’t pick up, and it’s good.

    The shackles look straight and it doesn’t seem like they’ve been damaged. The bushings look a bit worn out but far from shot, and this has been the case for a while.
     
    JasonC. likes this.
  5. Jan 8, 2024 at 11:05 AM
    #305
    shifty`

    shifty` I'm a member of a country club

    Joined:
    Jun 20, 2020
    Member:
    #48239
    Messages:
    25,740
    ATL
    Vehicle:
    '06 AC Limited V8/4WD
    (see signature for truck info)
    And looping back: The wheels haven't corrected, they're still shifted out farther one side, tucked in on the other? No evidence of weirdness with the rear swaybar? And the e-brack cable is taught to both sides?
     
  6. Jan 8, 2024 at 11:12 AM
    #306
    FiatRunner

    FiatRunner [OP] 2003 rich

    Joined:
    Nov 25, 2022
    Member:
    #87321
    Messages:
    779
    Gender:
    Male
    First Name:
    Jack
    Chicago Suburbs/Milwaukee
    Vehicle:
    2000 AC Limited TRD + 4WD + Thunder Gray
    See Refresh Thread
    The wheels have shifted back into their normal positions, everything is back to its normal spot. Truck drives normal.

    It’s clear that the axle has shifted over and somehow shifted back into place. The sway bar was clearly shifted over before, and it’s back to its normal spot just like everything else.

    My confusion is because I can’t figure out why/how it could shift back into place. I guess it’s good that it’s back where it should be, but that’s weird isn’t it?

    I swear the axle was shifted over. I’m not losing my mind. At least I don’t think I am.
     
  7. Jan 8, 2024 at 11:18 AM
    #307
    shifty`

    shifty` I'm a member of a country club

    Joined:
    Jun 20, 2020
    Member:
    #48239
    Messages:
    25,740
    ATL
    Vehicle:
    '06 AC Limited V8/4WD
    (see signature for truck info)
    My guess is your intial guess - the leafs slipped.

    And if you're hearing lots of pops and pings, you need to check and confirm there's a plastic spacer at the end of each leaf as intended, else you'll be scraping, creaking, and popping for a long time to come. You should find one at the end of every leaf making contact with a leaf above it, about 4mm-6mm thick. The knob locks down into a hole in the leaf spring.

    upload_2024-1-8_14-16-10.jpg

    upload_2024-1-8_14-18-40.png
     
  8. Jan 8, 2024 at 11:40 AM
    #308
    FiatRunner

    FiatRunner [OP] 2003 rich

    Joined:
    Nov 25, 2022
    Member:
    #87321
    Messages:
    779
    Gender:
    Male
    First Name:
    Jack
    Chicago Suburbs/Milwaukee
    Vehicle:
    2000 AC Limited TRD + 4WD + Thunder Gray
    See Refresh Thread
    Yeah, those plastic pads have been gone for a while. I’ve put marine grease in there a couple of times and it’s made it quieter but definitely hasn’t fixed it. I guess it’s time to order some…

    I’m certainly glad that things are back to normal.
     
  9. Jan 8, 2024 at 12:08 PM
    #309
    shifty`

    shifty` I'm a member of a country club

    Joined:
    Jun 20, 2020
    Member:
    #48239
    Messages:
    25,740
    ATL
    Vehicle:
    '06 AC Limited V8/4WD
    (see signature for truck info)
    OEM part number is 482520C010

    I know Dorman makes the part, it's like a 4pk or something. 924-070 should be the part number.
     
    FiatRunner[OP] likes this.
  10. Jan 8, 2024 at 3:36 PM
    #310
    rock climber

    rock climber New Member

    Joined:
    Oct 7, 2019
    Member:
    #37106
    Messages:
    1,711
    Gender:
    Male
    Colorado
    Vehicle:
    2001 Sequoia 4X4, 2000 AC 4X4
    I wish I could just gift you my truck. The pictures of the axle make me so sad. Stupid rust!
     
    JakeJake, FiatRunner[OP] and w666 like this.
  11. Jan 8, 2024 at 4:11 PM
    #311
    w666

    w666 D. None of the above

    Joined:
    Dec 17, 2019
    Member:
    #40020
    Messages:
    1,623
    Gender:
    Male
    Maryland
    Vehicle:
    04 Access Cab SR5 V8 4WD
    None yet
    I wasn't going to comment on rust as it wasn't germane to the spring shift problem, but now that it's fixed itself I can...I would get a wire wheel on that diff cover pronto, and then some rust converter/POR-15 before you wind up having to coat it all in JB Weld instead. Just sayin'...
     
    FiatRunner[OP] likes this.
  12. Jan 8, 2024 at 10:42 PM
    #312
    FiatRunner

    FiatRunner [OP] 2003 rich

    Joined:
    Nov 25, 2022
    Member:
    #87321
    Messages:
    779
    Gender:
    Male
    First Name:
    Jack
    Chicago Suburbs/Milwaukee
    Vehicle:
    2000 AC Limited TRD + 4WD + Thunder Gray
    See Refresh Thread
    I know, it’s bad. Definitely the worst spot of rust on the whole truck.

    This summer I’m planning on pulling the whole axle, having a new cover welded onto it, and then cleaning up the rest of the housing as well as the drum backing plates, U bolt brackets, etc.

    That’s the only reason I haven’t messed with it yet, it’s easier to keep it doused with fluid film and pray that it holds until the summertime. It doesn’t leak. Yet.
     
  13. Jan 21, 2024 at 5:59 PM
    #313
    FiatRunner

    FiatRunner [OP] 2003 rich

    Joined:
    Nov 25, 2022
    Member:
    #87321
    Messages:
    779
    Gender:
    Male
    First Name:
    Jack
    Chicago Suburbs/Milwaukee
    Vehicle:
    2000 AC Limited TRD + 4WD + Thunder Gray
    See Refresh Thread
    Bought a canoe! It looks real good on top of the truck. Anyone on here carried a canoe/kayak/long object on your roof? How did you secure it? Putting a big strap through the AC doors worked well but I’m concerned about the seals and weatherstripping.
    IMG_0252.jpg

    I also got the oil changed and rotated the tires at the same time. Not exciting but it’s real hard to work on the truck when it’s 4° outside. I didn’t remove the skid plate this time, I removed the oil filter from the top and was able to contain a good portion of the oil with a plastic bag. It worked well, I chalked the spilled oil up to rust prevention. Oil looked golden brown after nearly 8,000mi of fairly short trips. I’m considering doing an engine clean/flush this spring, is there a product that y’all would recommend? I have a friend that swears by the liqui moly stuff.
    IMG_0407.jpg

    I honestly haven’t been doing much to the truck since it’s been working so good. It’s been continuing to get 20+ MPG on the highway at 70mph, which is really awesome. I coated everything on the underside with PB Blaster Surface Shield this winter, instead of just some on the frame and axle housing. So far it’s working really really well, a light spray with the hose or a cheap car wash easily rinses all the salt away. It seems to be sticking quite well too.
    IMG_0307.jpg

    I’m back at college now and I brought the truck with me, unfortunately because I’m losing trust in my brothers to take care of it to my standards while I’m at school. I’ll miss driving around my Lexus but I’ll certainly like knowing that the truck is safe with me. We’ll see how well the truck works out when I visit my girlfriend 6 hours away, but I’m thinking it’ll be fine.
    IMG_0410.jpg
     
  14. Jan 21, 2024 at 6:04 PM
    #314
    shifty`

    shifty` I'm a member of a country club

    Joined:
    Jun 20, 2020
    Member:
    #48239
    Messages:
    25,740
    ATL
    Vehicle:
    '06 AC Limited V8/4WD
    (see signature for truck info)
    Liquimoly makes solid product. Anything BG makes is good too. @The Black Mamba would you recommend EPR followed by MOA?

    I personally run Seafoam high mile thru the crankcase about 500mi before my upcoming oil change and it's been slowly working away at the varnish in the top end. You don't want to get too agressive, better to shave off a little at a time.
     
    FiatRunner[OP] likes this.
  15. Jan 22, 2024 at 6:09 AM
    #315
    whodatschrome

    whodatschrome New Member

    Joined:
    Sep 13, 2023
    Member:
    #103882
    Messages:
    1,460
    Gender:
    Male
    North of North Plains, Oregon
    Vehicle:
    2000 Tundra 4wd AC, 2004 Tundra AC 2wd to 4wd conversion ABS delete
    lots of dents
    Seattle Sports hood loops is what i have on my Scion xB

    https://www.boundarywaterscatalog.com/seattle-sports/hood-loop-19809
     
  16. Jan 22, 2024 at 6:18 AM
    #316
    The Black Mamba

    The Black Mamba He must increase, but I must decrease - John 3:30

    Joined:
    Sep 6, 2023
    Member:
    #103472
    Messages:
    3,305
    First Name:
    Ryan
    DFW
    Vehicle:
    Black 00 SR5 AC 5VZ PreRunner
    Imma keep it stock
    Yessir!
     
  17. Jan 29, 2024 at 2:47 PM
    #317
    FiatRunner

    FiatRunner [OP] 2003 rich

    Joined:
    Nov 25, 2022
    Member:
    #87321
    Messages:
    779
    Gender:
    Male
    First Name:
    Jack
    Chicago Suburbs/Milwaukee
    Vehicle:
    2000 AC Limited TRD + 4WD + Thunder Gray
    See Refresh Thread
    I replaced the gas struts on my ARE bedcover. This bedcover is real strong fiberglass, and it’s heavy. I’m not at all a heavy guy, but I can walk on top of the thing. It’s solid.
    IMG_0493.jpg

    The old struts were so weak that it would barely hold its own weight in the summertime and wouldn’t stay at all in the winter. Don’t know why I put off replacing them so long. Took $24 and 5 minutes. The old ones looked pretty beat too:
    IMG_0494.jpg

    I’m also working on a light that will replace the cargo lamp/reverse lights in the 3rd brake light. I discovered that Harbor Freight sells 350 lumen, 180° optic rock lights for $25/pair.

    I then found a seller on Etsy that sells these 3D printed mounts for the lights. I think they’ll work perfect!
    IMG_0488.jpg IMG_0481.jpg IMG_0482.jpg IMG_0485.jpg

    I’ll wire the lights with a cheap adapter that’ll take place of the cargo lamp bulbs. No cutting any factory wiring!! I found this adapter/pigtail on eBay but I’ve seen it on scAmazon as well.
    IMG_0495.jpg

    Im thinking that I’ll epoxy the mounts to the lens. The 3D printed mount comes with holes for mounting bolts like this: (the two countersunk holes, the bottom one is for the wires)
    IMG_0490.jpg
    But I’m worried about drilling too many holes in the lens. Don’t want to make it fragile. I’m thinking epoxy to attach it and then plenty of silicone to seal it up. Not sure of a better way to attach them. Thoughts?
    IMG_0486.jpg

    I originally came up with this idea when I saw Baja Design’s rock lights a while ago, but at $140 for a pair, that’s more than I want to invest in a project that isn’t guaranteed to work. I’m sure that the Baja Designs lights are a lot higher quality, but I can replace the HF lights almost 6 times for the same cost. I’ve got less than $75 invested in the whole project so far, and I’ve heard pretty good things about the HF lights. Let me know what yall think!
     
    This site contains affiliate links for which the site may be compensated.
  18. Jan 30, 2024 at 12:49 PM
    #318
    importxpresions

    importxpresions New Member

    Joined:
    Dec 2, 2022
    Member:
    #87736
    Messages:
    61
    Vehicle:
    2001 SR5 AC Imp Jade Mica 2WD
    Shifty, after reading those posts on lower milage short trip tundras I purchased a DEPSTECH Dual Lens Industrial Endoscope from Amazon to check through the oil filler tube. My truck only has 103k on it and thankfully the top end didn't show any varnish or sludge. I'll have to get some pictures off of it.

    https://www.amazon.com/dp/B0928Q3T42?ref=ppx_yo2ov_dt_b_product_details&th=1
     
    Last edited: Jan 31, 2024
  19. Jan 30, 2024 at 2:05 PM
    #319
    shifty`

    shifty` I'm a member of a country club

    Joined:
    Jun 20, 2020
    Member:
    #48239
    Messages:
    25,740
    ATL
    Vehicle:
    '06 AC Limited V8/4WD
    (see signature for truck info)
    I also got that unit, so I can look up under my intake, check for rodent damage. I haven't used it on the truck yet, but it helped us solve a blockage issue with my neighbor's dryer vent stack a couple weeks ago! It's a pretty cool unit!
     
  20. Jan 30, 2024 at 2:21 PM
    #320
    Mr.bee

    Mr.bee King Turdra

    Joined:
    Jun 4, 2022
    Member:
    #79178
    Messages:
    6,427
    Gender:
    Male
    SATX
    Vehicle:
    '02 AC TRD
    My hazard frought scope's included batteries leaked schmoo all inside the box & rendered it inoperable. But it got me through a friends mini cooper.
     
    FiatRunner[OP] likes this.
  21. Jan 30, 2024 at 7:03 PM
    #321
    FiatRunner

    FiatRunner [OP] 2003 rich

    Joined:
    Nov 25, 2022
    Member:
    #87321
    Messages:
    779
    Gender:
    Male
    First Name:
    Jack
    Chicago Suburbs/Milwaukee
    Vehicle:
    2000 AC Limited TRD + 4WD + Thunder Gray
    See Refresh Thread
    Just got the HF lights installed!

    I started by removing the lens, and tearing the gasket since I had siliconed it in place. Awesome. I was then able to scuff up the lens a bit and attach the light mounts with JB weld. I’ve had really good luck with their stuff meant for plastic so I decided to use it here. The mounts are the perfect size, they cover nearly all of the white part of the lens, so it doesn’t really look like it’s just some cheap thing that’s been glued on, which I really like. They also don’t block access to the screws at all.
    IMG_0498.jpg

    After waiting for the glue to dry I carefully drilled holes for the wires to go through. I also drilled just one hole for a mounting bolt, but I didn’t have a bolt short enough on hand. If the JB Weld doesn’t hold I can always add one in the future fairly easily, but I’m not worried.
    IMG_0499.jpg

    Then the lights got attached and I wired up the bulb adapters. I was hoping to use a connector to allow for easy removal but there really wasn’t enough space inside the housing. After that I siliconed the hole for the wire, the gap around the mount, and the hole I drilled for a mounting bolt. All I had on hand was FIPG which worked great, but man that stuff is messy.
    IMG_0500.jpg

    I then was able to reinstall the lens without too much difficulty, I used a bunch of FIPG on the gasket where it tore. The bulb adapters were a tight fit and a little bit of a pain to install, I had to use needle nose pliers to reach all the way in there.
    IMG_0504.jpg
    IMG_0502.jpg
    IMG_0505.jpg

    I also decided to put a bead between the black housing and the body. The factory sealant looked pretty rough in there. I left the bottom open, to let water drain out I guess. I don’t know. I also put a bit on a couple small cracks on the roof rails. Definitely not my best caulking work but even if it was perfect the truck would still be 24 years old and have 200k.
    IMG_0501.jpg
    IMG_0506.jpg

    With it all hooked up, it works great! I’m super pleased with the results. They light up the bed area really well, which will be nice when the bedcover is removed. They also light up the sides of the truck nicely and are really bright, although the bed does block much of the area right next to the truck. They throw the light further than I expected.
    IMG_0512.jpg

    Notice how well lit up the house and fence are:
    IMG_0514.jpg
    This works perfect, the lit up areas are right where the mirrors are aimed. I’ll get better photos soon. Not a ton of actually dark areas in suburbialand.

    Also, for some reason I assumed those lights turn on with the reverse lights. They don’t, but they still work great as an aux reverse light for when you need it. Let me know what you guys think. With less than $80 invested, I’m pumped.
     
    Last edited: Jan 30, 2024
  22. Feb 3, 2024 at 2:36 PM
    #322
    455h0le_dachshund

    455h0le_dachshund Death machine and man in love

    Joined:
    Nov 21, 2023
    Member:
    #107257
    Messages:
    5,344
    First Name:
    Dog
    TX...big surprise
    Vehicle:
    Dragstrip Rocketship
    This is awesome. That's exactly where I keep my scanguage anyways, but without the cumbersome ashtray. Mines just velcroed to the extended ashtray, which makes it hard to access the lower outlets.
     
  23. Mar 4, 2024 at 7:42 AM
    #323
    FiatRunner

    FiatRunner [OP] 2003 rich

    Joined:
    Nov 25, 2022
    Member:
    #87321
    Messages:
    779
    Gender:
    Male
    First Name:
    Jack
    Chicago Suburbs/Milwaukee
    Vehicle:
    2000 AC Limited TRD + 4WD + Thunder Gray
    See Refresh Thread
    Did a 900 mile round trip to visit the girlfriend in Iowa. Tundra is a roadtrip machine!! Smooth, comfy, quiet, powerful, I forget how great this thing is.

    Zero problems aside from a leaky tire. Averaged 19.8mpg on the way there-
    IMG_0987.jpg

    And 20.6 on the way back. Not bad for the steep, long grades in eastern Iowa! There were a few places it decided to downshift, with cruise set @ 70.
    IMG_1001.jpg

    Hit 210k too. Officially marks 20k miles of ownership- the truck hit 190k on the day I got it.
    IMG_0994.jpg

    IMG_0985.jpg

    Mini projectors are still cranking! A 1st gen Sequoia owner asked me about them as I was filling my tire. I was more than happy to send him mini projector links.

    I can’t wait for nice weather. Got a big to-do list for the truck, and a big pile of parts too. I recently scored a used OEM power steering pump and reservoir with 40k miles for $50. Taken off a truck from Cali, they look brand new compared to mine. Just can’t wait!

    I’m hoping to get new tires, get all new brakes, get the 4WD working once and for all, and do a million little things this spring/summer. Any suggestions?

    IMG_0998.jpg
     
  24. Mar 24, 2024 at 8:45 PM
    #324
    FiatRunner

    FiatRunner [OP] 2003 rich

    Joined:
    Nov 25, 2022
    Member:
    #87321
    Messages:
    779
    Gender:
    Male
    First Name:
    Jack
    Chicago Suburbs/Milwaukee
    Vehicle:
    2000 AC Limited TRD + 4WD + Thunder Gray
    See Refresh Thread
    Bunch of little stuff-

    Lubed up the hood latch. Hood wouldn’t pop without someone lifting upwards on it. Fixed!
    IMG_1054.jpg

    Adjusted these hood stops. No more rattle at highway speeds, and also contributed to the better hood pop.
    IMG_1045.jpg

    One of the plastic bushings in the door hinges must’ve finally worn through. The drivers door used to close so wonderfully smooth and easy- not anymore. The door hangs probably 1/4” low when open and you have to slam it when closing. Feels like a worn out squarebody Chevy door. Not good. Needs fixed soon.
    IMG_1056.jpg

    I know that Dorman makes a kit to replace the pins and bushings, but has anyone replaced the whole hinge? I feel like I read somewhere that there isn’t any adjustment where the hinges attach to the door- which would make hinge replacement straightforward I think. OEM hinges are $20 ea and I have color matched paint. Thoughts?


    I’m hoping to get new tires in the next couple weeks. The Yokohama Geolandars that are on it weren’t ever rotated before I got the truck, so two are real worn out. Plus one leaks out 15psi in three days and I can’t find the leak.

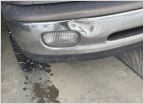
    I’m thinking that I’ll get Falken Rubitreks in 235/85. I’ve mentioned this tire/size combo before and it’s what Tyler208 runs. I spoke with him about this size and he thinks that they will fit without rubbing at no lift, and I think so too. However- the fender liner on the passenger side of my truck is messed up from when the LBJ went out.

    When the LBJ snapped, the tire hit the fender and the truck was held off the ground by only the fender.
    IMG_8980.jpg

    This pulled the fender both upwards and outwards:
    IMG_1145.jpg
    IMG_1151.jpg

    It also messed up the fender liner. It pulled it out of the clips at the top and bent/pushed it backwards. It’s been tucked into this location ever since:
    IMG_1148.jpg

    I’m worried that the new tire will rub at the two peaked spots of the fender liner. I can easily see that it’s closer to the wheel than the drivers side without any measuring. The 235/85 is an inch taller but also an inch and a quarter narrower than the stocks. I’m not opposed to a new fender liner, but it won’t line up unless I somehow get the fender back to its original spot. I’d rather not remove the fender if I don’t have to- it’s a guarantee that the little 10mm bolts will be rusted and snap off when removal is attempted. I really really don’t want to deal with rubbing. What do you guys think would be the best option?
     
    The Black Mamba likes this.
  25. Mar 26, 2024 at 10:11 AM
    #325
    FishNinja

    FishNinja HIDE YOUR DAUGHTERS

    Joined:
    Jan 3, 2024
    Member:
    #109562
    Messages:
    1,907
    Gender:
    Male
    First Name:
    Lee
    TEXAN....big surprise
    Vehicle:
    06DC2wd

    I recommend a kayak rack for the bed/bed rails. Or put it in the bed and get a hitch mount bed extender.

    not my truck, but you get the ideaIMG_4411.jpg
     
  26. Mar 26, 2024 at 12:55 PM
    #326
    daveeasa

    daveeasa FBC Harness Solutions

    Joined:
    Dec 2, 2020
    Member:
    #55605
    Messages:
    4,151
    Gender:
    Male
    First Name:
    David
    PNW
    Vehicle:
    2002 Tundra SR5 RCLB 4x4, 2005 RC 5MT Prerunner, 2016 Tacoma OR DCSB 6MT
    8’ bed FTW. Lightweight ratchets (thin rope style) to tie downs (charvonia designs) and a poly red / orange flag. Also get a lift so your truck butt is high enough that any passenger vehicle smacks your steel bumper before the watercraft.
     
    FiatRunner[OP] likes this.
  27. Mar 26, 2024 at 12:56 PM
    #327
    daveeasa

    daveeasa FBC Harness Solutions

    Joined:
    Dec 2, 2020
    Member:
    #55605
    Messages:
    4,151
    Gender:
    Male
    First Name:
    David
    PNW
    Vehicle:
    2002 Tundra SR5 RCLB 4x4, 2005 RC 5MT Prerunner, 2016 Tacoma OR DCSB 6MT
    I actually managed the tandem in my ‘05 Tacoma w the 6’ bed just fine. But it was more overhang than I felt comfortable and no lift and also stock bumper.
     
  28. Apr 7, 2024 at 7:57 PM
    #328
    FiatRunner

    FiatRunner [OP] 2003 rich

    Joined:
    Nov 25, 2022
    Member:
    #87321
    Messages:
    779
    Gender:
    Male
    First Name:
    Jack
    Chicago Suburbs/Milwaukee
    Vehicle:
    2000 AC Limited TRD + 4WD + Thunder Gray
    See Refresh Thread
    Did another 900 mile round trip to visit my girlfriend for the weekend. Used two tanks of gas, one got me there and the second got me back. Good enough for me! Hit 212k miles. 139 million wheel rotations!
    IMG_1276.jpg

    I got to finally use the mini projector high beams, at least somewhere where there isn’t streetlights or light pollution. They’re really really powerful- I could light up the road probably 3/4 of a mile away.
    IMG_1256.jpg
    I take back some of my previous statements about the poor beam quality when using high beams. You don’t notice the irregularities in the beams much when you’re using them.

    I’m also planning on putting a harbor freight air compressor where the ABS pump would go, if it had ABS. (Isn’t that odd, a truck with every option but ABS?) Kinda like this, but mounted in line with the edge of the fender:
    IMG_1263.jpg
    (This photo is stolen from some thread on here- can’t remember who’s)

    It would fit nicely in that spot without having to work around the ABS pump, hopefully there’d also be room for a short hose. I’d like to wire it to a second fog light switch that would go where this blank is:
    IMG_1099.jpg
    But iirc, those switches are hard to find. Has anyone put an identical fog light switch there? I want my switch install to look as OEM as possible.
     
    bmf4069 and The Black Mamba like this.
  29. Apr 8, 2024 at 6:25 AM
    #329
    The Black Mamba

    The Black Mamba He must increase, but I must decrease - John 3:30

    Joined:
    Sep 6, 2023
    Member:
    #103472
    Messages:
    3,305
    First Name:
    Ryan
    DFW
    Vehicle:
    Black 00 SR5 AC 5VZ PreRunner
    Imma keep it stock
    Yes, there are and yes it will fit. I mocked up mine up see as I also plan on putting a second switch there in the future. @txagg was cool enough to send me one recently and it included the harness so I have that for when I source a second switch.
     
    txagg and FiatRunner[QUOTED][OP] like this.
  30. Apr 9, 2024 at 1:33 PM
    #330
    Boone01Tundra

    Boone01Tundra New Member

    Joined:
    Oct 26, 2021
    Member:
    #69849
    Messages:
    61
    Gender:
    Male
    First Name:
    Benjamin
    Boone, NC
    Vehicle:
    2001 AC Tundra V8. OEM 2 tone. Leather 48k miles
    I have a switch to go in the blank space but it says 115V on it. It's from a Sequoia and it is the oval kind. I grabbed it because I usually only see the rocker ones that are in the console and not the oval ones like in a Tundra. my plan is to put a converter in and the plug near the tail gate.
     
    FiatRunner[OP] likes this.

Products Discussed in

To Top