1. Welcome to Tundras.com!

    You are currently viewing as a guest! To get full-access, you need to register for a FREE account.

    As a registered member, you’ll be able to:
    • Participate in all Tundra discussion topics
    • Transfer over your build thread from a different forum to this one
    • Communicate privately with other Tundra owners from around the world
    • Post your own photos in our Members Gallery
    • Access all special features of the site
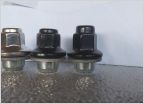
Rock warrior bead lock removal

Discussion in 'Wheels & Tires' started by OldGuy03, May 1, 2023.

  1. May 1, 2023 at 3:12 PM
    #1
    OldGuy03

    OldGuy03 [OP] Still new here, but working on it

    Joined:
    Apr 25, 2023
    Member:
    #96046
    Messages:
    13,612
    Gender:
    Male
    First Name:
    Jay
    CO
    Vehicle:
    12 MGM DC RW
    Today I was all geared up for frustration and lots of broken t-30 bits to get my fake bead locks off of the rock warrior wheels. I had read numerous accounts of people using up to 18/20 plus bits to get the screws out of the wheel. Apparently the loctite Toyota used is a real bugger and just breaks the tips right off of the bits.

    So I gathered up all the torx bits I could find around my shop and grabbed the PB Blaster and went to work hoping I had enough bits to get the job done. 3 broken bits later and I had only broken 9 of the total 48 screws loose. So off to lowes I went. I bought a couple of different brands of bits and headed back home. The first pack I opened was the wiha terminator blue impact rated set. 15 minutes later I was done and still using my first bit with not a one more broken.

    I used a ratchet to break the screws loose , then my driver to get them out. Not sure if that's why I didn't break more bits or these are just rated correctly?

    Anyhow, If you're interested in this diy, I can't recommend these bits enough.

    But here's my question to this great community. As I'm waiting for my plastidip coats to cure I'm thinking this may be a few days before I can get the bead locks back on. Should I reattach the screws into the wheels, or just leave them out for a few days?

    My other question revolves around using plastidip itself. I've never used it, and was wondering if I should follow the same rattle can procedure I normally do for prep. Clean, sand, clean again and primer. The can doesn't mention any primer needing to be used in the application process.

    Appreciate all feedback ahead of time. Thanks

    DA003E0D-DC7A-4E2C-8488-8E55542CB1DC.jpgBE6CD459-AA9B-4944-96A8-36544848B268.jpg
     
    Last edited: May 1, 2023
  2. May 1, 2023 at 4:22 PM
    #2
    Rubberdown

    Rubberdown Spilling my guts here.

    Joined:
    Jan 23, 2019
    Member:
    #24972
    Messages:
    1,231
    Houston, TX
    You don’t take those off to plastidip. When you put the screws in it’s going to tear the plastidip around the holes. Maybe you could use a small nylon washer or something?

    probably be like 100 bucks to get them powder coated.
     
  3. May 2, 2023 at 8:24 AM
    #3
    surffj62

    surffj62 New Member

    Joined:
    Dec 25, 2019
    Member:
    #40303
    Messages:
    141
    Gender:
    Male
    Vehicle:
    2011 DBL RW
    I took mine out and plasti dipped them. You can do the with the screws just be gentle in the last few turns.
    I sanded my rings and sprayed. Maybe once every two years I redo them.
    The beauty of plasti s you can peel off and respray. Not nice like a powder coat but no tears when I ding them up.
     
  4. May 2, 2023 at 8:26 AM
    #4
    surffj62

    surffj62 New Member

    Joined:
    Dec 25, 2019
    Member:
    #40303
    Messages:
    141
    Gender:
    Male
    Vehicle:
    2011 DBL RW
  5. May 2, 2023 at 11:04 AM
    #5
    OldGuy03

    OldGuy03 [OP] Still new here, but working on it

    Joined:
    Apr 25, 2023
    Member:
    #96046
    Messages:
    13,612
    Gender:
    Male
    First Name:
    Jay
    CO
    Vehicle:
    12 MGM DC RW
    thanks for this @surffj62

    My thoughts exactly on why I'm following this route. No tears when the powder coat gets dinged. And roughly 10% of the cost.
     
  6. May 5, 2023 at 12:32 PM
    #6
    OldGuy03

    OldGuy03 [OP] Still new here, but working on it

    Joined:
    Apr 25, 2023
    Member:
    #96046
    Messages:
    13,612
    Gender:
    Male
    First Name:
    Jay
    CO
    Vehicle:
    12 MGM DC RW
    Had good enough weather to get my lock rings installed today. No problems with the screws messing up the plasti dip and am loving how they turned out. Now I'm just waiting on some custom center cap decals I'm having made. Thanks for the pics @surffj62 E701C47E-E5BC-4824-95AA-65984DC65BF4.jpg
    painting in process, used 2 complete cans which gave me 5 coats.

    A16F6733-4F8D-45D6-9458-98ACAB08C6D6.jpg
    The final look
     
    Last edited: May 5, 2023
  7. May 5, 2023 at 2:15 PM
    #7
    Silver17

    Silver17 Used, but returned and sold as new member

    Joined:
    Oct 3, 2021
    Member:
    #68847
    Messages:
    3,521
    Gender:
    Male
    Eastern PA
    Vehicle:
    2017 TRD 4x4 Harrop SC
    Eibach pro 2.0s, toytec progressive mini AAL, ARE CX cap, Airlift bags, Harrop Supercharger, 650cc injectors, 77.5mm pulley, SABM, TRD Dual exhaust, Solid Offroad motor mounts, J&L catchcan, Powertrax LSD, FN BFDs with 285/75r18 Kenda R/Ts.
    1/4” impact gun with the impact torx bits gets those off much more effortlessly in my experience. I then chase the threads and they go in smoothly next time around. That was my experience after removing rings on 2 sets.
     
    Trusty Rusty likes this.
  8. Jan 23, 2024 at 3:06 PM
    #8
    COTundra23

    COTundra23 New Member

    Joined:
    Aug 14, 2019
    Member:
    #34617
    Messages:
    979
    Gender:
    Male
    can you tell us more about the custom center caps??
     
  9. Jan 23, 2024 at 4:30 PM
    #9
    OldGuy03

    OldGuy03 [OP] Still new here, but working on it

    Joined:
    Apr 25, 2023
    Member:
    #96046
    Messages:
    13,612
    Gender:
    Male
    First Name:
    Jay
    CO
    Vehicle:
    12 MGM DC RW
    DB213DD7-AF84-49EB-94F8-41E6037CDA2B.jpg
    Here is what they look like completed with custom stickers on my center caps.

    More details here.

     
    COTundra23 likes this.
  10. Jan 28, 2024 at 8:55 PM
    #10
    Hoosier33

    Hoosier33 New Member

    Joined:
    May 16, 2023
    Member:
    #97116
    Messages:
    12
    First Name:
    Matt
    Vehicle:
    2019 Cement Tundra Limited
    Nice setup!
     
  11. Oct 23, 2024 at 3:42 PM
    #11
    BlackSheep

    BlackSheep ol’ Reliable

    Joined:
    Aug 21, 2018
    Member:
    #18406
    Messages:
    1,203
    Gender:
    Male
    First Name:
    Scott
    Kansas City, MO
    Vehicle:
    2010 Black DC 5.7L 4x4
    2.5” shocks, 3/1 level, 37s, 5.29s, air locker, on-board air, bed cap, bed stiffeners, roof rack, steps/sliders, spare carrier, under seat storage bins, window tint
    I really don't know what the hell Toyota was thinking with the bolts on these beadlock rings. I first removed mine about six years ago and had a lot of problems then, as they had never been taken off before as far as I know. Fast forward to now, and I am removing them again to have new tires put on the wheels. I did not use any loctite at all six years ago when I put them back on, and still I had incredible difficulty getting them off this time around. Three of them ended up stripping the bolt head completely so now I will have to drill the bolt heads off and re-tap the holes.

    It's absolutely ridiculous to me that these little bolts should be made so impossible to remove.
     
  12. Oct 23, 2024 at 3:46 PM
    #12
    snivilous

    snivilous snivspeedshop.com

    Joined:
    Apr 16, 2019
    Member:
    #29192
    Messages:
    4,726
    SW UT
    Vehicle:
    300k+ Supercharged 2008
    Did you anti seize them? I don't know about fake locks but that's what you do on real beadlocks :rofl:
     
    whodatschrome, Mdl and OldGuy03[OP] like this.
  13. Oct 24, 2024 at 6:28 AM
    #13
    BlackSheep

    BlackSheep ol’ Reliable

    Joined:
    Aug 21, 2018
    Member:
    #18406
    Messages:
    1,203
    Gender:
    Male
    First Name:
    Scott
    Kansas City, MO
    Vehicle:
    2010 Black DC 5.7L 4x4
    2.5” shocks, 3/1 level, 37s, 5.29s, air locker, on-board air, bed cap, bed stiffeners, roof rack, steps/sliders, spare carrier, under seat storage bins, window tint
    I did not but I definitely will be when they go back on again.
     
  14. Oct 24, 2024 at 7:49 AM
    #14
    Mdl

    Mdl Hey there...

    Joined:
    Jun 14, 2023
    Member:
    #98638
    Messages:
    2,897
    Gender:
    Male
    PNW, WA
    Vehicle:
    2007 TRD SC'd
    JBA Longtubes, Snivs 2.0 SC pulley, ASP crank overdrive pulley 6.71 in, DD Full 3inch dual exhaust, IPT valve body, Airbox mod, 4.5inch intake, Denso 750, 450 Walbro, W/M injection, GM 95mm TB, SABM, Camburg UCA, Icon shocks, Speedmaster LSD, Motive 5.29 Gears, Mickey Thompson Baja Legend EXP 35's, DIY Traction Bars, Tuning by snivspeedshop.com
    I left the rings off about 10 years ago. No idea if I even have them.
     
  15. Oct 24, 2024 at 7:55 AM
    #15
    OldGuy03

    OldGuy03 [OP] Still new here, but working on it

    Joined:
    Apr 25, 2023
    Member:
    #96046
    Messages:
    13,612
    Gender:
    Male
    First Name:
    Jay
    CO
    Vehicle:
    12 MGM DC RW
    If you ever find them @Shanet421 is looking to buy some.
     
    Mdl[QUOTED] likes this.
  16. Oct 24, 2024 at 9:18 AM
    #16
    Shanet421

    Shanet421 (Semi) New Member

    Joined:
    Oct 17, 2020
    Member:
    #53708
    Messages:
    1,444
    Gender:
    Male
    San Diego,CA
    Vehicle:
    2013 CM 5.7L 4x4 SR5 Super White
  17. Jan 3, 2025 at 2:57 PM
    #17
    Trusty Rusty

    Trusty Rusty New Member

    Joined:
    Oct 30, 2024
    Member:
    #125088
    Messages:
    31
    Gender:
    Male
    Houston, TX
    Vehicle:
    2011 Rock Warrior CrewMax
    Any of y'all recall the thread sizing for chasing/potentially re-tapping the holes? I've got maybe 2/3 of the bolts broken loose from a set of 5 and they're giving me hell...going to snag a pack of the Wiha Terminator bits recommended by @OldGuy03 and hopefully will have some better luck. Snapped 2x Milwaukee T30 impact bits, my Sunex T30 impact bit (3/8 drive) and another T30 socket I had in the box. One head is officially stripped, so assuming I'll have to drill that out. Going to try slotting the head first and see if I can get a fat flathead screwdriver on it first.

    What a mess...swing a miss by Toyota on the Rock Warrior hardware situation, standard hex head bolts would've been far superior (although maybe not as aesthetically pleasing...).

    Thanks for the previous posts and anyone else for any other suggestions!
     
    OldGuy03[OP] likes this.
  18. Jan 3, 2025 at 3:36 PM
    #18
    Shanet421

    Shanet421 (Semi) New Member

    Joined:
    Oct 17, 2020
    Member:
    #53708
    Messages:
    1,444
    Gender:
    Male
    San Diego,CA
    Vehicle:
    2013 CM 5.7L 4x4 SR5 Super White
    OldGuy03[OP] and Trusty Rusty like this.
  19. Jan 4, 2025 at 11:16 AM
    #19
    Trusty Rusty

    Trusty Rusty New Member

    Joined:
    Oct 30, 2024
    Member:
    #125088
    Messages:
    31
    Gender:
    Male
    Houston, TX
    Vehicle:
    2011 Rock Warrior CrewMax
    Big thanks for the info on the tap, purchased one last night. Still working my way though the rest of the old bolts. So far only one is stripped - plenty of others still intact that are putting up a fight. The T30 1/4" drill bits seem to be the best approach, so hoping the "Terminators" work their magic. All of the larger 3/8" torx sockets with a T30 tip on it reduce down too far to keep any sort of strength down at the tip. Broke out the IR air hammer and have been pounding on through the center of the bolt head with the spike attachment...seems to have jarred 3-4 of them loose so that the impact could handle the rest of the extraction. Searching deep down for that patience I've never had. :annoyed:
     
    OldGuy03[OP] likes this.
  20. Jan 4, 2025 at 11:30 AM
    #20
    Shanet421

    Shanet421 (Semi) New Member

    Joined:
    Oct 17, 2020
    Member:
    #53708
    Messages:
    1,444
    Gender:
    Male
    San Diego,CA
    Vehicle:
    2013 CM 5.7L 4x4 SR5 Super White

    Haha I feel your pain. I ended up having to drill out 4 total. I don’t recommend using an extractor unless it’s a really good one. I snapped 2 of them inside the screw. So difficult to drill out an extractor that I wouldn’t hesitate and just drill it out before trying that again!
     
    Trusty Rusty[QUOTED] likes this.
  21. Jan 4, 2025 at 11:51 AM
    #21
    Shanet421

    Shanet421 (Semi) New Member

    Joined:
    Oct 17, 2020
    Member:
    #53708
    Messages:
    1,444
    Gender:
    Male
    San Diego,CA
    Vehicle:
    2013 CM 5.7L 4x4 SR5 Super White
    All this said I will be assembling a set here soon. I don’t mind having to check torque a few times just do not want to have to fight them off again in the future.

    What is the general consensus as to using anti-seize of some sort?

    Any type better for this use than another?
     
  22. Jan 4, 2025 at 4:51 PM
    #22
    Trusty Rusty

    Trusty Rusty New Member

    Joined:
    Oct 30, 2024
    Member:
    #125088
    Messages:
    31
    Gender:
    Male
    Houston, TX
    Vehicle:
    2011 Rock Warrior CrewMax
    Good feedback on the extractor...I'll avoid that route entirely. Assume you just started with small drill bits and stepped up diameter each time you reamed out the center until they came out? Planning to use plenty of drilling oil as well. Hoping to tackle this tomorrow...the Terminator bit in the 1/4" impact successfully pulled 3 bolts last night when I did a quick test run. The neighbors will enjoy the music of the air hammer beating on those bolts tomorrow, luckily 4/5 wheels still have tires on them and somewhat deaden the noise. I'll be rocking some muffs with plugs underneath. :frusty:

    Planning to not run anything in these and pull them off periodically for a quick clean/check. Anti-seize seems like a good option as well...looks like both of us are living salt-free lives, but they still seem to bind up without much help. Interested to hear from others on this. The wheels I'm fighting with were OG's out of SoCal and were mint other than the finish being entirely worn down...they still had some trash in the threads and that damn blue factory loctite is a monster!
     
  23. Jan 4, 2025 at 5:44 PM
    #23
    Shanet421

    Shanet421 (Semi) New Member

    Joined:
    Oct 17, 2020
    Member:
    #53708
    Messages:
    1,444
    Gender:
    Male
    San Diego,CA
    Vehicle:
    2013 CM 5.7L 4x4 SR5 Super White
    I am not changing the color drastically and just polishing the rings and caps

    IMG_9129.jpg


    Yes start small and slow with lots of lube.
     
    Last edited: Jan 4, 2025
    Trusty Rusty likes this.
  24. Jan 4, 2025 at 6:00 PM
    #24
    Ponderosa_Pine

    Ponderosa_Pine

    Joined:
    Sep 14, 2022
    Member:
    #83377
    Messages:
    1,102
    Northwest
    Vehicle:
    2021 Tundra DC, 2022 4R, 2007 FJ
    Magnuson Supercharged, Dobinson Lift, 315/70r17 on Rockwarriors, Heftyfab bumper, Dirty Deeds 3” race exhaust
    I refinished 12 of the wheels and had to drill out about 10 bolts total. Went through every brand of Torx bit I could find and used a large breaker bar. Slotting the bolt is a good idea, I didn’t think of that at the time. It seems like the main issue with the bolts is the different metal types corroding together. The ones I did drill I just ended up making them look like the other holes and put threads back in them.

    Anti seize is definitely a good idea for them, plus annual on/off to check.
     
    Trusty Rusty and Shanet421 like this.
  25. Jan 4, 2025 at 6:08 PM
    #25
    Shanet421

    Shanet421 (Semi) New Member

    Joined:
    Oct 17, 2020
    Member:
    #53708
    Messages:
    1,444
    Gender:
    Male
    San Diego,CA
    Vehicle:
    2013 CM 5.7L 4x4 SR5 Super White
    Trusty Rusty and Ponderosa_Pine like this.
  26. Jan 4, 2025 at 9:32 PM
    #26
    OldGuy03

    OldGuy03 [OP] Still new here, but working on it

    Joined:
    Apr 25, 2023
    Member:
    #96046
    Messages:
    13,612
    Gender:
    Male
    First Name:
    Jay
    CO
    Vehicle:
    12 MGM DC RW
    Assume you're also using some sort of penetrant?
     
  27. Jan 5, 2025 at 7:25 AM
    #27
    Trusty Rusty

    Trusty Rusty New Member

    Joined:
    Oct 30, 2024
    Member:
    #125088
    Messages:
    31
    Gender:
    Male
    Houston, TX
    Vehicle:
    2011 Rock Warrior CrewMax
    These look sharp - the OEM look is pretty on the money, I'm not planning to make any drastic changes aside from a full refresh. How'd you go about polishing the rings/caps? Any suggestions/guidance? I've got some pretty wicked corrosion on a few of the rings on the extra-extra set and have considered trying to refresh those myself versus powder.

    I'm going to try the large breaker bar and see what happens...the only one that stripped so far was the bolt I did by hand (with a T30 socket vs impact bit), so I've had best luck with the small 1/4" impact not wanting to strip out. Agree with your thoughts on what makes the corrosion so strong with the dissimilar materials. The periodic checks is a must!

    Absolutely, but the penetrant really doesn't travel down into the threads from what I've noticed on the ones that were extracted after soaking. The corrosion residue is entirely dry down past the bolt head within the wheel threads, so doubt I'm getting much help from the PB. And no backside access of course...slow and steady today.
     
    OldGuy03[QUOTED][OP] likes this.
  28. Jan 5, 2025 at 7:47 AM
    #28
    Shanet421

    Shanet421 (Semi) New Member

    Joined:
    Oct 17, 2020
    Member:
    #53708
    Messages:
    1,444
    Gender:
    Male
    San Diego,CA
    Vehicle:
    2013 CM 5.7L 4x4 SR5 Super White

    As polishing went I used 3m stripping pads fine/ultra fine. Then used Mothers mag and aluminum polish. I did use a drill and various pads to speed up the process.

    Any extra-extra (extra) rings or caps you won’t be using I’m your guy!
     
  29. Jan 5, 2025 at 8:04 AM
    #29
    rcsbguy

    rcsbguy New Member

    Joined:
    Jun 3, 2024
    Member:
    #117908
    Messages:
    208
    Not seeing this mentioned in here - use a torch!!! 90 seconds on the backside of the wheel will loosen it up. The Wiha helps, but on those stuck ones, heat is your friend.
     
    Shanet421 and OldGuy03[OP] like this.
To Top