1. Welcome to Tundras.com!

    You are currently viewing as a guest! To get full-access, you need to register for a FREE account.

    As a registered member, you’ll be able to:
    • Participate in all Tundra discussion topics
    • Transfer over your build thread from a different forum to this one
    • Communicate privately with other Tundra owners from around the world
    • Post your own photos in our Members Gallery
    • Access all special features of the site
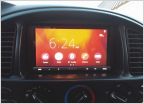
Steering Rack Welded Nut Stripped

Discussion in '1st Gen Tundras (2000-2006)' started by KreachR, Feb 6, 2025.

  1. Feb 6, 2025 at 7:32 AM
    #1
    KreachR

    KreachR [OP] New Member

    Joined:
    Aug 18, 2024
    Member:
    #121558
    Messages:
    53
    Gender:
    Male
    First Name:
    Brandon
    Vehicle:
    2005 Tundra, Limited, Double Cab, 2WD
    CAI (AirRaid), Exhaust (Unkown)
    Morning y'all!

    My issue is the horizontal (lower, I believe) bolt that goes into the welded nut on the cross member which holds down the bushing support spun when I was trying to torque it down. I got a new stud and nut, but to no avail, I believe the nut on the cross member is just toast.

    Is it possible to grind the welds and just jb weld a new nut to the cross member? I see a lot of people have run into this, but they're using helicoil kits. Would rather have an actual OEM nut that is supposed to be there. Thanks!
     
  2. Feb 6, 2025 at 7:58 AM
    #2
    KNABORES

    KNABORES Sarcasm incoming

    Joined:
    Jan 1, 2020
    Member:
    #40572
    Messages:
    13,691
    Gender:
    Male
    Arkansas
    Vehicle:
    2000 Limited TRD AC 4X4 Thunder Grey 278k miles. *SOLD* 2019 Limited TRD CM 4x4
    Bilstein 5100's on the forbidden notch Husky HD rear leafs 16x8 Eagle Alloy 187's with 285/75/16 MagnaFlow 3" flow through Pioneer touchscreen with backup camera Full interior and dash LED conversion Trailer brake controller with 7 pin Bedliner coat bumpers & trim ARE Mpulse topper - Rhino Vortex rack
    Get a new nut that fits the longer bolt and use it to tighten the bolt into place. Tack weld onto the crossmember if desired, use a washer if not.
     
    The Black Mamba likes this.
  3. Feb 6, 2025 at 8:01 AM
    #3
    FiatRunner

    FiatRunner 2003 rich

    Joined:
    Nov 25, 2022
    Member:
    #87321
    Messages:
    1,113
    Gender:
    Male
    First Name:
    Jack
    Chicago Suburbs/Milwaukee
    Vehicle:
    2000 AC Limited TRD + 4WD + Thunder Gray
    See Refresh Thread (link in signature)
    You’re talking about this bolt here, right?
    IMG_1509.jpg

    Why can’t you put a wrench on the other side? I really don’t think JB weld would hold.
     
  4. Feb 6, 2025 at 8:18 AM
    #4
    KreachR

    KreachR [OP] New Member

    Joined:
    Aug 18, 2024
    Member:
    #121558
    Messages:
    53
    Gender:
    Male
    First Name:
    Brandon
    Vehicle:
    2005 Tundra, Limited, Double Cab, 2WD
    CAI (AirRaid), Exhaust (Unkown)
    Nope. It's the one on the front side of the sub-frame which holds the u-bracket on and has a stud going through it. Picture here.


    I'm not sure what the previous owner was thinking, but there's evidence of it trying to be removed, from what I can see. Looking at it further, not sure it can be removed...hmmm...maybe chasing would allow the threads to grab and get to the 123ft lbs of torque recommended for the nut. Problem is, I can get the stud in, but when I tighten the nut, the stud just spins and keeps catching then loosening.
     
    FiatRunner[QUOTED] likes this.
  5. Feb 6, 2025 at 8:27 AM
    #5
    FiatRunner

    FiatRunner 2003 rich

    Joined:
    Nov 25, 2022
    Member:
    #87321
    Messages:
    1,113
    Gender:
    Male
    First Name:
    Jack
    Chicago Suburbs/Milwaukee
    Vehicle:
    2000 AC Limited TRD + 4WD + Thunder Gray
    See Refresh Thread (link in signature)
    Hmm. I doubt that you are going to be able to save the nut. Is there room to get another nut on top of the existing one? There's been a couple times when I have had to drill out a stripped nut and put another one on top.

    Also, 123ft-lbs is a lot. There's what, 6 large bolts holding the steering rack on? I'd bet you don't need the full amount of torque on that one nut. I don't remember putting a torque wrench on that bolt when I changed my rack bushings. Not sure I even own a torque wrench that goes up that high.
     
    The Black Mamba likes this.
  6. Feb 6, 2025 at 8:38 AM
    #6
    KreachR

    KreachR [OP] New Member

    Joined:
    Aug 18, 2024
    Member:
    #121558
    Messages:
    53
    Gender:
    Male
    First Name:
    Brandon
    Vehicle:
    2005 Tundra, Limited, Double Cab, 2WD
    CAI (AirRaid), Exhaust (Unkown)
    That's actually not a bad idea, if there's room. Yeah, I agree, it's almost impossible for me to get that torque on there with 200 lbs of fat ass behind me as well. Not trying to save the nut, really would like to replace it and just have a washer on either side and bolt it up. I was thinking that I may be able to break some of the tack welds with an oscillating multi-tool with a carbide blade to get it off, then replace with a washer and nut, just to keep it secure. There are three (I believe) other anchor points, but no other anchor points on the passenger, so the thought of driving it makes me nervous. I'll try the multi-tool and report back. Appreciate the help!
     
  7. Feb 6, 2025 at 8:40 AM
    #7
    FiatRunner

    FiatRunner 2003 rich

    Joined:
    Nov 25, 2022
    Member:
    #87321
    Messages:
    1,113
    Gender:
    Male
    First Name:
    Jack
    Chicago Suburbs/Milwaukee
    Vehicle:
    2000 AC Limited TRD + 4WD + Thunder Gray
    See Refresh Thread (link in signature)
    Sounds like a good plan to me! Good luck.
     
  8. Feb 6, 2025 at 8:35 PM
    #8
    whodatschrome

    whodatschrome New Member

    Joined:
    Sep 13, 2023
    Member:
    #103882
    Messages:
    1,770
    Gender:
    Male
    North of North Plains, Oregon
    Vehicle:
    2000 Tundra 4wd AC, 2004 Tundra AC 2wd to 4wd conversion ABS delete
    lots of dents
    Cut or torch out old nut, stitch weld in new nut
     
  9. Feb 7, 2025 at 5:27 AM
    #9
    Retired...finally

    Retired...finally Utilizing that doctorate of procrastinatory arts

    Joined:
    Aug 6, 2021
    Member:
    #66426
    Messages:
    3,258
    Gender:
    Male
    First Name:
    Dan
    Vehicle:
    2021 Barcelona Red SR5 Crewmax
    Custom bug spat pattern hood, grill & bumper. Dead Live Oak leaf collection under hood, cowl and lower fenders. Beach sand custom floor covering.
    The rack would probably require removal in order to helicoil. The height of the stripped nut leads me to think it's not hardened. Probably since welding it in place would soften it. It looks like the PO tried to chisel it off and it's highly unlikely that would work.
    If you can find a good sawzall blade that would fit in the confined space the circular part of the nut could be cut off the the hex head area allowing more room for a nut to be added.
    It's unfortunate situation to be in but repairable.
     
  10. Feb 7, 2025 at 2:11 PM
    #10
    KreachR

    KreachR [OP] New Member

    Joined:
    Aug 18, 2024
    Member:
    #121558
    Messages:
    53
    Gender:
    Male
    First Name:
    Brandon
    Vehicle:
    2005 Tundra, Limited, Double Cab, 2WD
    CAI (AirRaid), Exhaust (Unkown)
    Got that damn thing off, finally. I ground what I could with a grinding wheel, and then finished it off with a carbide multi-tool and cold chisel. After that: painted bare metal and bolted it noice and toit like a toiger! Thanks all!
     
    Retired...finally and FiatRunner like this.
  11. Feb 7, 2025 at 2:28 PM
    #11
    Retired...finally

    Retired...finally Utilizing that doctorate of procrastinatory arts

    Joined:
    Aug 6, 2021
    Member:
    #66426
    Messages:
    3,258
    Gender:
    Male
    First Name:
    Dan
    Vehicle:
    2021 Barcelona Red SR5 Crewmax
    Custom bug spat pattern hood, grill & bumper. Dead Live Oak leaf collection under hood, cowl and lower fenders. Beach sand custom floor covering.
    Thanks for the report back and kudos for your perseverance. Ya done good.
     
    KreachR[OP] likes this.

Products Discussed in

To Top