

-
Welcome to Tundras.com!
You are currently viewing as a guest! To get full-access, you need to register for a FREE account.
As a registered member, you’ll be able to:- Participate in all Tundra discussion topics
- Transfer over your build thread from a different forum to this one
- Communicate privately with other Tundra owners from around the world
- Post your own photos in our Members Gallery
- Access all special features of the site
Quick Links: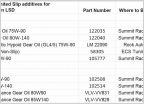 Gear Oil without Limited Slip additives for TrueTrac, Helix, Torsen, Grip Pro differentials Oil filter for Synthetic
  Recommended OBD Scanner for 2009 Tundra TRD vs S&B vs K&N intakes
 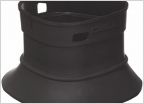 TRD Intake Flow Accelerator For Cold Air Intake. Air Intake System
  TRD Supercharger on Flex Fuel 3UR-FBE
TRD/Magnuson VS Harrop supercharger comparison:
Discussion in 'Performance and Tuning' started by ViktorG, Mar 18, 2021.
Page 1 of 2
Page 1 of 2
Products Discussed in


